EN
EN
 Deutsch
 Italiano
 Español
 Français
 日本語
日本語

University of RV Science (For RV Dealerships & Accessory Retailers) Today, in the RV market space, having to just mention RV Shore Power is not enough to address the increasing customer requirement for independence from energy. After all, why settle for “just power” when you can obtain a better experience that is also more affordable and greener for discerning RVers? This guide-specifically put together for you, the RV dealer and accessory retailer-is your complete solution to connect shore power with solar photovoltaic systems; allowing you to showcase unsurpassed intelligence in a growing market.

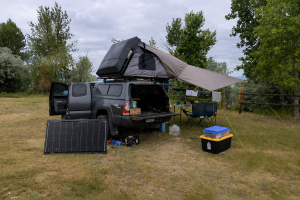
Why "Shore Power + Solar" is the New Standard
The power supply of an RV is like a meal plan: the Shore Power inside the campground is the main course with as much energy as you could potentially want. It is like having vitamins in the form of Solar PV as a snack to keep you going and serve as a fallback rations. Both are irreplaceable; they complement one another perfectly.
Scenario Synergy: At a well-equipped campground, Shore Power delivers worry-free, high-wattage electricity. But while on the road or boondocking in a scenic, off-grid location, the solar system takes over, powering essential appliances like the refrigerator, lights, and water pump.
Core Advantages:
Lower Expenses: Reduce costs at campgrounds with metered electricity by harnessing free energy from the sun.
Extended Freedom: Dramatically increase the RV’s off-grid endurance, allowing your customers to explore more remote and unique destinations.
Enhanced Experience: Say goodbye to the noise and fuel consumption of a traditional generator and enjoy the peace and quiet of the great outdoors.
Backed by Market Data: According to trend reports from the RV Industry Association (RVIA), solar prep is rapidly becoming an industry standard. A 2023 survey revealed that over 65% of new RVs now ship either with solar pre-installed or “Solar-Ready” pre-wiring. This is a clear signal that offering sophisticated solar upgrade packages is now an essential core competency for any dealership.
Understand Shore Power Specs Before Sizing Solar
Before you can recommend a solar package, you must first accurately assess the client’s foundational electrical platform—their Shore Power service. This determines the vehicle’s “power ceiling” and provides the baseline for sizing the “supplemental power” from a solar array.
(Dealer’s Quick Reference Chart)
| Shore Service | Max Wattage | Typical RV Match | Typical AC Loads | Recommended Supplemental Solar* |
| 15 Amp | 1,800 W | Small trailers, Camper Vans (Class B) | Basic lights, small fridge, device charging | 200W – 400W |
| 30 Amp | 3,600 W | Mainstream Class C & travel trailers | Single AC unit + microwave (not simultaneously) | 400W – 800W |
| 50 Amp | 12,000 W | Large Class A & Fifth Wheels | Dual AC units + induction cooktop + washer/dryer | 600W – 1,200W+ |
Footnotes:
Recommended solar wattage is estimated based on 5-6 peak sun hours per day. It aims to cover daytime DC loads (fridge, LEDs, water pump, fans), preserving battery storage for nighttime or overcast days.
⚡ The 50 Amp Deep Dive: Unlike a 30 Amp service, which is a single 120V circuit, a 50 Amp RV service is a 120V/240V split-phase connection. It features two separate 50A, 120V hot legs. This provides a total available power of (50A × 120V) × 2 = 12,000W. This massive capacity allows it to run 240V appliances (like a residential dryer) or multiple high-draw 120V appliances at once. Explaining this correctly is a key differentiator between amateur and expert advice.
Authoritative External Link: To learn more about RV electrical systems, reference the technical library from Progressive Industries.
How Solar Panels Seamlessly Couple with a Shore Power System
Integrating solar power into an existing RV electrical system is all about “smart” and “automatic” operation, ensuring the user enjoys optimal energy use without manual intervention.
DC Coupling Priority: Modern, high-quality inverter/chargers from brands like Victron Energy or Magnum Energy feature advanced power management logic. When the solar panels are producing DC power, the system will prioritize using that solar energy to power DC loads and charge the batteries. Only when the solar input is insufficient will the unit automatically draw power from the AC Shore Power connection to supplement.
MPPT Controller Voltage Window: This is the most critical technical aspect of system design. You must ensure the solar array’s open-circuit voltage (V_oc), adjusted for the coldest anticipated ambient temperature, remains below the MPPT controller’s maximum input voltage rating.
Safety Formula:
Corrected Voc = Voc (at STC) × (1 + (Min. Temp - 25°C) × Temp. Coefficient). As a rule of thumb for a safety margin, you can estimate this usingVoc × 1.15.Simultaneously, the panels’ maximum power voltage (V_mp) should always be at least 5V higher than the battery bank’s charging voltage to ensure effective charging.
Anti-Reverse Flow Protection: This is solved by a dual-redundant system.
Bypass Diodes: These are integrated into every solar panel’s junction box.
Charge Controller: All modern solar charge controllers inherently function as a one-way valve. At night, they automatically open the circuit, physically preventing any reverse current flow from the batteries back to the solar panels. No extra “blocking diodes” are needed.
EMS/ATS Integration:
An Automatic Transfer Switch (ATS) is the standard device that switches an RV’s power source between a generator and Shore Power.
An advanced Energy Management System (EMS) can manage multiple power sources and apply logic—for instance, prioritizing solar during peak utility rate hours or prioritizing shore power for rapid bulk charging.
Flexible vs. Rigid: The Best Panel for Every Roof Type
Choosing the right type of solar panel for different RV roof styles is the art of balancing efficiency, durability, and ease of installation.
| Roof Type | Recommended Panel | Avg. Weight/Panel* | Key Installation Points |
| Completely Flat, Hard Roof | Rigid Panels (100W–220W) | 25–30 lbs | Mount with Z-brackets and sealant. The air gap underneath ensures excellent heat dissipation, leading to the best efficiency, longest lifespan, and lowest cost-per-watt. |
| Slight Curve (<30°) | Semi-Flexible Panels (100W–200W) | 4–7 lbs | Best installed on a thin backer board to create an air gap. Use 3M™ VHB™ Tape for a secure, drill-free installation. |
| High-Curvature / Pop-Top | Ultra-Flexible Panels (50W–110W) | 2–3 lbs | Adhere directly to the roof with 3M™ VHB™ tape and seal the edges with a product like Eternabond to prevent wind lift. Offers a perfect, stealthy fit. |

Dealer Inventory Checklist: 5 Critical Parameters
To efficiently serve 80% of your customer base, your inventory should be built around these key parameters:
Power SKUs: Stock 100W, 160W, and 200W panels. These three sizes can be flexibly combined to meet the vast majority of needs, from basic battery maintenance to serious off-grid living.
Voltage Class: 12V-nominal panels are the standard. However, as 24V systems become more common, it’s important to stock a few 24V options or know how to series-connect 12V panels.
Efficiency & Temperature Coefficient:
Efficiency: Choose monocrystalline panels with a conversion efficiency of >21%. Higher efficiency means more power from limited roof space.
Temperature Coefficient: Look for a power temperature coefficient of ≤ -0.35%/°C. A lower number is better, meaning less power loss as the panel heats up.
Certifications: Ensure your supplier provides products certified to IEC 61215/61730 and UL 1703/61730. These are the gold standards for safety, performance, and reliability.
Connectors: Prioritize panels that come pre-wired with MC4 or Anderson connectors. These industry-standard plugs are waterproof and secure, improving reliability and reducing installation time.
Installation & After-Sales: Empowering Your Customer
Professional installation advice and a clear warranty promise are the final steps in building lasting customer trust.
Minimize Wire Runs: Keep the total cable distance from the panels to the controller to the batteries under 20 feet and use appropriately gauged copper wire to keep voltage drop below 3%.
Ensure Cooling Air Gap: Rigid panels must have an air gap of at least 1-2 inches between the panel and the roof for cooling. Even flexible panels benefit from a micro air gap if mounted on a thin backer board.
Use Fuses/Breakers: In accordance with NEC Article 690.9, an overcurrent protection device (like a 15A DC breaker or fuse) must be installed on the positive leg of each solar string for safety.
Set an Inspection Schedule: Advise customers to perform a visual inspection every 6 months. They should check for loose connections, cracked sealant, and clean the panel surfaces.
Provide a Clear Warranty Script: Communicate the industry-standard warranty clearly: “This panel includes a 25-year linear power warranty, guaranteeing at least 90% of rated output after 10 years, and at least 80% after 25 years.” This provides enormous peace of mind and reinforces the value of their investment.