If you have ever asked yourself, “How many solar panels do I need for my RV,” you’ve likely tried those simple online calculators: plug in your appliances, and it spits out a number—like “You need 600W.” It sounds easy, right?
But in the real world, the math is only half the battle. Most blogs and calculators teach you how to size a system for an “ideal environment”—assuming it’s always sunny, assuming you have infinite roof space, and assuming you’ll never park under a tree.
As a manufacturer providing OEM components to the world’s leading RV brands, Sungold Solar sees the truth: The real bottleneck often isn’t how much power you need, but how you manage physical constraints and installation risks.
This guide moves beyond basic arithmetic. We will teach you how to conduct an accurate power audit and navigate the challenges of roof integrity, shading sabotage, and system scalability.
The Foundations — Power Audits and the Golden Formula
Before buying any panels, you must know your “target number.” The biggest point of confusion for beginners is the units.
Step 1: Conducting an RV Power Audit (Wh vs. Ah)
Don’t guess your setup. You need to create a list and check the labels on your appliances.
Watt-Hours (Wh): This measures the total energy you consume in a day. For example, a 60W laptop running for 2 hours = 120Wh.
Amp-Hours (Ah): This is the “fuel tank” capacity of your battery. In a 12V system, $100Ah \approx 1200Wh$.
Typical RV Appliance Power Reference:
LED Lights: 10W (5 hours/day = 50Wh)
12V RV Fridge: 50-80W avg. (Consumes ~600-1200Wh daily due to compressor cycles)
Laptops: 60W (4 hours/day = 240Wh)
RV Air Conditioner (The Big Boss): 1200-1500W+ (This is the primary reason for massive system spikes)
Step 2: Identify Your “Peak Sun Hours” (Not Just Daylight)
A common mistake: assuming that 14 hours of daylight equals 14 hours of solar charging.
Peak Sun Hours represent the equivalent hours when solar intensity reaches $1000W/m^2$:
Summer: 5-6 hours on average across North America.
Winter: Can drop to 2 hours or less due to the low angle of the sun.
If you plan on full-time boondocking in Oregon during the winter but size your system based on Florida summer data, you will face critical power shortages.
Step 3: The Golden Sizing Formula
Once you have your data, apply the industry-standard formula:
The Golden Sizing Formula:
Total Wattage = Daily Consumption (Wh) / (Peak Sun Hours × 0.75)
Note the Efficiency Factor (0.75-0.85): Never calculate based on 100% efficiency. Inverter conversion, wiring resistance, and dust on the panel surface will all “steal” your power. As industry experts emphasize, don’t rely on the outdated “1W=1Ah” rule; it will leave you in the dark on cloudy days.
Reality Check — Overcoming the Three Physical Constraints
As a manufacturer for global OEMs, we’ve learned that success isn’t just about the math—it’s about how you manage your rig’s physical limitations.
This is where we transition from a basic blog to an expert guide, addressing the “blind spots” found in most competitor content.
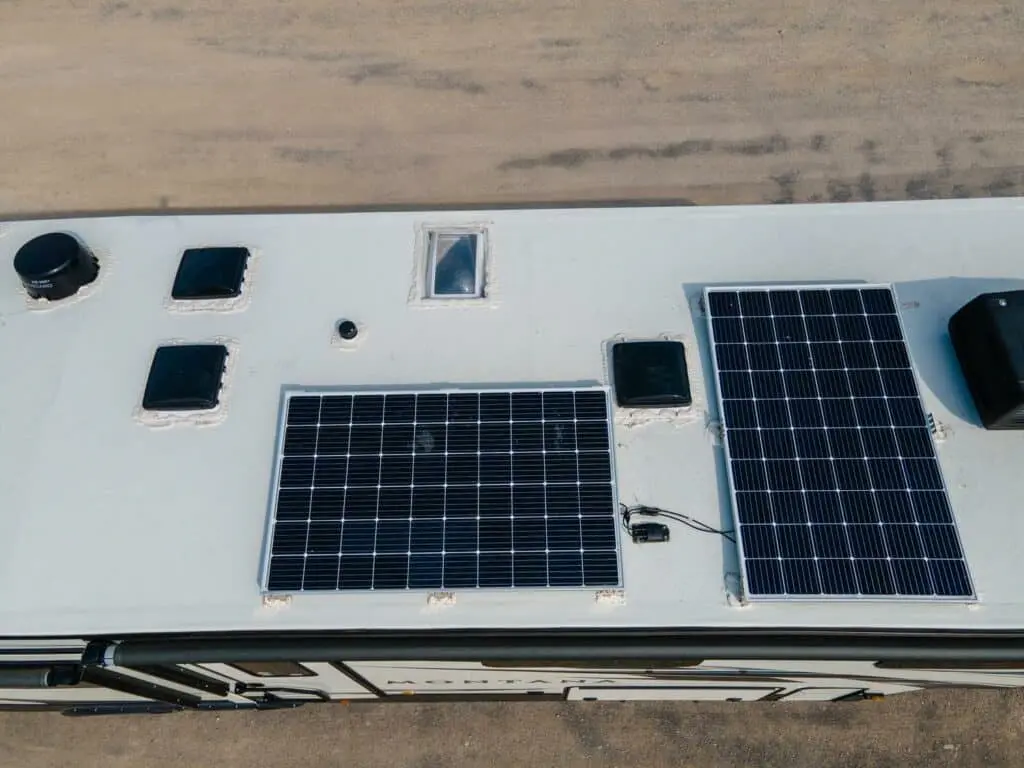
The “Real Estate” Problem (Roof Space)
Math might say 800W, but your roof says 400W once you account for AC units and vents.
The High-Efficiency Solution: Switch to Sungold BC (Back-Contact) Series. These capture more light per square inch, providing 10-15% more power in the same footprint.
The “Walkable” Strategy: Use our TF Series (Walkable) Panels. Don’t choose between “power” and “access”—install panels on your roof’s walking paths.
The “Shade Killer” & The Series Connection Myth
For years, RVers were told “one shadow kills the whole string.” This is largely outdated.
Bypass Diodes & Series Connection: Modern high-quality panels include effective Bypass Diodes. If an AC unit shades one panel in a series, the others keep working.
The High-Voltage Advantage: By running panels in Series (Higher Voltage), your system starts charging earlier in the morning and stays on later in the evening compared to parallel setups. It also reduces current, meaning less heat and smaller cables.
Cell-level Shadow Management: Sungold’s 863 circuit technology allows current to flow like water around a stone, automatically bypassing shaded cells. Even with 25% shade, you can maintain 65% power output.
Roof Integrity & The “Z-Bracket” Hassle
Most RV roofs are thinner than you think—often just rubber over a thin layer of particle board.
The Problem with Z-Brackets: Traditional Z-brackets are a maintenance nightmare. Removing a panel for cleaning or expansion requires peeling off old sealant and patching holes.
The Lightweight Revolution: The Sungold PA621 Series is a lifesaver for fragile roofs. They are 70% lighter than glass and can be bonded directly without drilling, preserving your roof’s integrity while eliminating wind drag.
Sizing by Scenario — Stop Guessing, Start Matching
Based on data from thousands of OEM customers, 90% of RVers fall into one of these three categories:
Scenario A: The Weekend Warrior (500–1000Wh/day)
Setup: 200W of Flexible Panels + 100Ah LiFePO4 Battery.
Scenario B: The Full-Timer / Digital Nomad (1000–2000Wh/day)
Setup: 400W–600W BC Array + 200Ah–300Ah Lithium Battery.
Scenario C: The AC-Ready Boondocker (Heavy: >2000Wh/day)
Setup: 800W+ Rooftop Array + Portable Folding Kits for ground deployment.
Pro Tip: If you drive daily, ensure your system integrates a DC-DC Charger. The engine’s alternator can often produce more power than your solar panels while on the move.

Technical Deep-Dive — The Details You Can’t Ignore
System Voltage: Upgrading to 24V or 48V
If your system exceeds 1200W, staying at 12V is a mistake. Large currents lead to overheating controllers and massive cables.
Efficiency Boost: Moving to 24V or 48V allows a single charge controller to handle significantly more solar (e.g., doubling capacity from 1300W to 2900W) while the system runs much cooler.
Modular Design: Leave Room to Grow
Don’t scatter panels randomly. Plan your roof layout as a grid.
Layout Strategy: Choose panels with standardized widths (like our 30-inch units) to maximize coverage.
Oversize Your Controller: Buying a controller “just big enough” for your current 400W setup means throwing it away when you want to expand to 800W. Buy for the system you want in two years, not just the one you have today.
The OEM Perspective
As a manufacturer, we’re telling you: lab data doesn’t equal road performance.
Salt Spray Testing: If you’re heading to the coast, ensure your panels are rated for salt mist. Cheap junction boxes will corrode in months without it.
Hail Impact Testing: Your RV is exposed to the elements. Sungold’s rigid panels are rigorously tested to ensure they don’t shatter during unpredictable weather.
Calculating how many solar panels you need is just the beginning. The perfect RV power system is a balance between math, roof real estate, and weight management.
Don’t just chase high wattage—chase high efficiency. Whether you need walkable surfaces for maintenance, lightweight tech for fuel savings, or shingled cells for shaded campsites, choosing the right technology (BC, TOPCON, or PERC) is the real key to off-grid freedom.
Ready to upgrade your rig?
FAQ
Q: How many panels do I need to run my RV Air Conditioner? A: Typically 800W to 1000W of solar coupled with at least 400Ah of Lithium. We also strongly recommend a “Soft Start” device to reduce the initial compressor surge.
Q: How much power does a 100W panel produce per day? A: In ideal conditions (5 peak hours), it produces roughly 500Wh. That is enough to run a 12V fridge for about half a day.
Q: If I have a generator, do I still need solar? A: Solar provides silence and zero operating costs. A generator is loud and requires fuel. Most pros use solar for 90% of their needs and keep a generator only for winter backups or emergency AC use.