Installing solar panels on an RV involves 8 core steps: roof inspection → tool & material prep → panel layout planning → mounting (rigid or flexible) → cable routing & roof penetration → waterproof sealing → system wiring (battery → controller → panels) → commissioning. Most DIYers finish a 200–400W system in 1–2 days. The two biggest failure points are poor roof sealing and wrong wiring order — this guide covers both in detail.
There's no shortage of RV solar tutorials online, but most of them skip the parts that actually trip people up — like what adhesive works on your specific roof membrane, why the cable from your controller to the battery needs to be way thicker than you'd expect, or how one wrong step in the wiring sequence can kill a $200 MPPT controller before you even flip the switch.
This guide is built around the real-world details. Whether you're mounting a pair of 200W rigid panels on a Class C motorhome or bonding a flexible panel to a curved Airstream roof, you'll find the specifics you need — not just the general idea.
Before you buy anything, it's worth calculating exactly how much power your rig actually needs. Check our RV solar panel size calculator to figure out how many watts and how much battery capacity your setup requires — this determines which panel type and how many you'll be mounting.
What You'll Need Before You Start
Gathering everything before you climb on the roof saves a lot of aggravation. Here's an honest breakdown of what the job actually requires.
Tools
- Variable-speed drill with metal and wood bits — for bracket bolts and cable entry holes
- Multimeter (DC and AC ranges) — for testing panel voltage, controller output, and verifying polarity before you connect anything
- Fish tape / wire snake (2–5m) — if you're routing cables through wall cavities
- Caulk gun — for applying roof sealant
- Torque wrench (5–25 Nm range) — to tighten bracket bolts properly without cracking the roof substrate
- Heat gun or hair dryer — for heat-shrink terminals and warming adhesive in cold weather
- Tape measure, chalk line, marker — for layout
Materials & Components
- Solar panels (see sizing guide above)
- Mounting hardware (Z-brackets for rigid / press strips or VHB tape for flexible)
- Cable entry gland (IP65+ rated)
- Solar cable: 4mm² or 6mm² UV-rated, length to reach from roof to controller
- MC4 connectors (male + female pairs, matching your panel leads)
- Isopropyl alcohol or acetone — to clean roof surface before bonding
- Butyl tape — as a first waterproof layer under bracket feet
- Roof-compatible sealant (see the roof type chart below)
- Fuse holders + fuses (sized per circuit — more on this in the wiring section)
- Cable clips / UV-rated zip ties — to secure runs along the roof edge
Step 1 — Roof Inspection and Layout Planning
Know What You're Working With Before You Buy
Walk your roof with a tape measure and a pad. Note every obstacle: air conditioner shroud, vent caps, antennas, roof rack crossbars, plumbing vents. These aren't just physical obstacles — on a sunny day, each one casts a shadow that moves with the sun, and a shadow hitting even one cell in a traditionally-wired series string can cut the output of the entire string significantly.
Measure the actual usable area after removing obstacles and leaving airflow margins (at least 2–3 inches clearance around rigid panels for heat dissipation). Then identify your roof membrane type — this determines your mounting and sealing approach.
| Roof Type | Common RVs | Recommended Bracket Method | Compatible Sealant | Avoid |
|---|---|---|---|---|
| EPDM Rubber | Most Class A & C motorhomes | EPDM-specific base pads + stainless bolts | EPDM lap sealant (self-leveling or non-sag) | Silicone — bonds poorly to EPDM and contaminates the surface for future repairs |
| TPO (Thermoplastic) | Newer production RVs | TPO-compatible adhesive base or heat-welded foot | Sikaflex 715 or TPO-specific adhesive | Silicone, solvent-based adhesives |
| Fiberglass (FRP) | Class B vans, custom builds | Z-bracket with stainless bolts | Sikaflex 515 / 715, polyurethane sealant | Solvent-based products that can etch the surface |
| Aluminum | School bus conversions, custom builds | Self-tapping screws + rubber backing washers | Silicone or polyurethane | Butyl tape alone in hot climates (softens and migrates) |
| Curved composite | Airstream, teardrop trailers | Flexible panel with VHB + perimeter strips | Polyurethane + VHB double-sided tape | Rigid brackets on pronounced curves |
Also check structural integrity — especially on older RVs. Poke around delamination-prone areas near the edges and near any existing roof penetrations. Installing a 25-pound array on a section of roof that's already soft is asking for trouble.
Step 2 — Choose Your Mounting Method
There isn't one universal right answer here. The best mounting method depends on your roof geometry, how much you want to drill, and whether you're going with rigid or flexible panels.
| Method | Drilling Required? | Best For | Waterproofing Difficulty | Typical Load Rating |
|---|---|---|---|---|
| Z-Brackets (rigid panels) | Yes — 4 bolts per panel | Flat roofs, any rigid panel | Medium (butyl tape + sealant per bolt) | High — panel sits 1–2" off roof for airflow |
| Flat/Tilt Mounts | Yes | Installations needing tilt adjustment | Medium | High, but adds wind profile |
| VHB Tape + Adhesive (flexible) | No | Curved roofs, lightweight vans | Low — no penetrations | Medium — risk of delamination on very long hauls |
| Adhesive + Perimeter Press Strips | Minimal (strip bolts only) | Flexible panels on semi-curved roofs | Low-Medium | Good — hybrid mechanical + adhesive |
| Through-bolt (flexible with grommets) | Yes — through panel grommets | Long-term flexible installs | Medium | Best option for flexible panels on high-mileage rigs |
A Note on Flexible Panel Installs
Flexible panels glued directly to a roof with nothing else holding them have a real failure rate — not immediately, but after a few thousand highway miles. The vibration and the thermal cycling (roofs heat up dramatically in summer sun) work on the adhesive bond constantly. If you're going flexible, combine VHB tape on the back surface with a mechanical fastening method — either stainless bolts through the factory grommets with large backing washers, or an aluminum perimeter press strip. This isn't belt-and-suspenders overkill; it's what keeps the panel on the roof three years from now.
Also: leave a small air gap. Flexible panels bonded completely flat to a roof with no airflow underneath run noticeably hotter than panels with ventilation. Higher panel temperature directly reduces output — in summer conditions, a panel with no airflow can lose 10–20% more power than one with a small gap.
For curved roofs like Airstreams, ETFE-coated flexible panels from Sungold Solar conform without cracking and use a proper UV-stable front layer that won't yellow or degrade within a few seasons the way cheaper PET-coated panels do.
Step 3 — Mount the Panels
Rigid Panel Installation (Z-Brackets)
- Mark your final panel positions on the roof with chalk. Double-check the layout accounts for shadow cast by the AC shroud at various times of day.
- Attach Z-brackets to the panel frame first using the provided hardware. Don't fully tighten yet.
- Position the panel on the roof, check alignment one more time, then mark the bracket bolt holes.
- Remove the panel and drill pilot holes at each mark (use the correct bit for your roof substrate).
- Apply butyl tape around each hole as a primary water barrier, then position the bracket feet.
- Insert stainless steel bolts, apply a bead of compatible sealant around the base of each bracket foot, then tighten to spec. Don't overtighten — you can crack the roof substrate or compress the butyl so much it loses its sealing function.
- Mount the panel back onto the brackets and torque the bracket-to-panel bolts to spec.
- Apply a generous secondary bead of sealant around the entire base of each bracket foot and feather it smooth. It should look like a small ramp, not a bead sitting on top of the surface.
Flexible Panel Installation
- Clean the roof surface thoroughly with isopropyl alcohol. Let it dry completely. Any oil, dust, or wax will prevent proper bonding.
- Do a dry run — lay the panel on the roof without adhesive and verify fit, cable reach, and positioning.
- For through-bolt installations: drill holes at grommet locations, slide grommets in from the top, feed the bolt, apply butyl tape around each hole before seating the grommet.
- For adhesive installs: apply VHB tape in a grid or perimeter pattern on the panel back. Peel and stick, pressing firmly from the center outward. Apply enough pressure to activate the adhesive bond properly.
- Secure the cable leads with UV-rated clips or zip ties — loose cables flapping in the wind act like small drills on your panel's exit seal over time.
Step 4 — Route Cables and Create the Roof Penetration
You need to get the positive and negative solar leads from the roof into the RV interior without creating a leak. There are three realistic ways to do this:
- Dedicated cable entry gland — the cleanest solution. A purpose-built waterproof housing mounts flat on the roof and accepts 2–4 cables through individual sealed ports. Mount it low on the roof near the edge, closest to where your controller will be. This is what most production RV solar installs use.
- Existing RV conduit or vent — some RVs have factory pre-run conduit or an accessible vent path. Running cables through existing paths avoids new holes entirely.
- Direct bore — drill your own hole, insert a rubber grommet, route cables, and seal thoroughly. Totally valid but requires more careful waterproofing.
Regardless of method, keep the cable entry point as low-profile as possible and on a section of the roof that sheds water naturally. Never create a penetration in a low spot where water pools.
Run your cables toward the controller along the roof edge and secure every 12–18 inches. Leave some slack at the panel junction box — you want a gentle curve rather than a tight 90-degree bend at the stress point.
Step 5 — Seal Everything Properly (The Step That Prevents Disasters)
Honestly, more RV solar installations fail from a water leak than from a wiring mistake. The leak is slower, harder to trace, and by the time you notice it — usually as delamination in the interior ceiling — it's already caused real damage.
Good sealing is a two-layer job:
- Primary layer (under the hardware): Butyl tape around bolt holes and under bracket feet. This is your first seal and works by compression.
- Secondary layer (over the hardware): A compatible liquid sealant applied over the bracket base, entry gland perimeter, and any exposed bolt heads. Feather the edges so water runs off rather than under.
After applying all sealant, wait the manufacturer's recommended cure time before driving or washing the roof. Most sealants need 24–48 hours to properly cure, and driving before cure can flex the joint enough to break the seal before it's set.
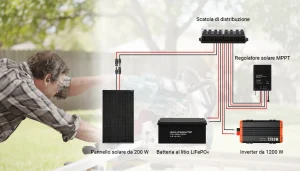
Step 6 — Wire the System (Order Matters More Than You Think)
① Battery → ② Charge controller → ③ Solar panels
When disconnecting, reverse it: panels first, then controller, then battery.
Connecting panels before the controller creates a live voltage on the controller's input terminals before it's properly initialized — this can damage or destroy the MPPT circuitry instantly.
Understanding Your Three Circuits
This is the part most beginner guides get wrong. A solar system has three electrically distinct cable runs, and each one needs to be sized for its own current load — not one universal wire gauge for everything.
| Circuit Segment | Characteristics | Typical Current | Recommended AWG (12V, 400W) | Fuse Location |
|---|---|---|---|---|
| Panels → Controller | Higher voltage, lower current (especially if panels are in series) | 10–20A typical | 10 AWG | On the positive lead, near the controller input |
| Controller → Battery | Lower voltage (12/24V), higher current — this is the dangerous one | 25–40A typical for 400W @ 12V | 6 AWG minimum | On the positive lead, within 12" of battery positive terminal |
| Inverter → Battery | Extremely high current — up to 250A on large inverters | 80–200A+ depending on inverter size | 2/0 AWG for 2000W+ @ 12V | On the positive lead, within 12–18" of battery positive terminal |
The controller-to-battery segment is where most DIY fires start — using the same light wire that works fine on the panel side but seriously undersizes the high-current DC segment. A wire running at 150% of its rated current doesn't immediately fail; it just runs warm for a while, then warmer, then at some point the insulation fails or the connection arcs. Use the right gauge.
Fuse Placement
Every positive lead needs a fuse or circuit breaker, and fuse location matters as much as fuse size. The fuse is protection against a short circuit between that fuse and the load — anything between the battery and an unprotected fuse is unprotected wire. Keep each fuse within 12 inches of its power source's positive terminal:
- Controller-to-battery positive: fuse within 12" of battery positive
- Inverter positive cable: fuse within 12–18" of battery positive
- DC loads from the battery: fused at the distribution block
Size each fuse at approximately 125% of the circuit's maximum expected current. For a 40A controller, use a 50A fuse on that leg.
Series vs. Parallel Panel Wiring
If you have more than one panel, you need to decide how to connect them before running cables down from the roof.
- Series: Voltages add up, current stays the same. Good for long cable runs (higher voltage = lower current = can use thinner wire). Works best with MPPT controllers. Critical check: confirm the combined open-circuit voltage (Voc × number of panels) doesn't exceed your controller's maximum input voltage.
- Parallel: Currents add up, voltage stays the same. More tolerant of partial shading. Requires thicker cables. Each parallel string should have its own inline fuse to prevent backfeed.
Step 7 — Install the Charge Controller and Inverter
Charge Controller Placement
Mount the controller on a vertical surface near the battery bank with decent airflow — not in a sealed cabinet. MPPT controllers generate heat during charging and need air circulation to operate efficiently and last their expected lifespan. Most controllers have ventilation slots on the back; make sure these aren't blocked.
Keep the controller-to-battery cable run as short as practically possible. Every foot of that high-current cable is voltage drop that reduces charging efficiency.
Inverter Placement
The inverter has the same requirement but more extreme: mount it as close to the battery as physically possible. Inverter cables carry the highest current in the system — a 2000W inverter on a 12V system pulls over 160A at full load. Every additional foot of cable at that current level wastes meaningful power and increases risk. Many experienced builders aim for a maximum 18-inch cable run from battery to inverter, which is why people often mount the inverter directly on or next to the battery box.
Use pure sine wave inverters for RV applications — modified sine wave units are cheaper, but they cause buzzing in audio equipment, can overheat some motor loads (like AC compressors), and don't work with certain electronics at all.
MPPT vs. PWM — Does It Matter for Installation?
Yes, slightly. MPPT controllers accept a wider input voltage range, which means you can wire panels in series to raise the voltage and run smaller gauge cable from the roof. PWM controllers need the panel voltage to be close to battery voltage — which forces parallel wiring and larger cables for higher-wattage systems. If you're running more than 200W, MPPT almost always makes more practical sense, not just for efficiency but for the wiring logistics.
Step 8 — Commission and Test the System
A lot of guides end at "connect the panels." The commissioning step is where you actually confirm the system is doing what it's supposed to do — and catch any mistakes before they become expensive problems.
Commissioning Checklist (Print This)
- Panel open-circuit voltage (Voc) matches spec — test each panel or string separately
- All MC4 connectors fully seated and clicked — tug-test each one
- Correct polarity on all connections (positive to positive, negative to negative)
- All fuses in place and correct rating
- Controller-to-battery positive fused within 12" of battery terminal
- Inverter positive cable fused within 18" of battery terminal
- Charge controller powering up and displaying battery voltage correctly
- Controller showing charge current from panels (any sunlight)
- Battery voltage/SOC increasing with panels active
- Inverter output voltage correct (120V AC for US, 230V for EU) — check with multimeter
- Inverter operates under test load with no alarms or shutdowns
- All roof penetrations visually inspected — no gaps or uncured sealant
- Cable runs secured every 12–18" on roof
- Grounding connections secure (panel frames to chassis ground if applicable)
If the controller isn't showing any charge current in decent sunlight, the first places to check are: MC4 connectors (most common issue — not fully clicked), reversed polarity on the panel-side input, and a blown input fuse. Don't skip the multimeter — it takes minutes to test Voc at the panel, then at the controller input, which immediately tells you if the problem is in the panels, the cable run, or the controller itself.
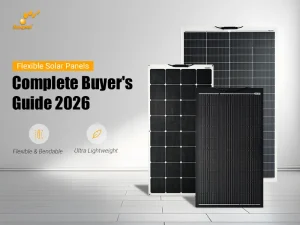
Rigid vs. Flexible Panels: Which One Is Right for Your Roof?
This decision gets made too often by aesthetics or price rather than by what actually fits the situation. Here's a direct comparison focused on installation considerations:
| Factor | Rigid Monocrystalline | ETFE Flexible | Lightweight Rigid |
|---|---|---|---|
| Efficiency (rated) | 21–24% | 16–21% | 20–23% |
| Weight per 100W | 15–20 lbs | 3–5 lbs | 7–12 lbs |
| Curved roof compatible | No | Yes | No |
| Requires drilling | Usually yes | No (adhesive) or minimal | Usually yes |
| Airflow / heat | Natural gap with brackets | Minimal if fully bonded — loses up to 10–20% real output | Same as rigid |
| Expected lifespan | 25+ years | ETFE: 15–20 years / PET: 5–10 years | 25+ years |
| Best for | Flat-roofed Class A/C, maximum efficiency priority | Airstream, van builds, curved roofs, low-weight installs | Large RVs with roof weight limits |
If you're on a curved roof like an Airstream or fiberglass van conversion, flexible is your only practical option. For everything else, rigid panels deliver more watts per dollar over the lifetime of the system — and if you're weight-limited, lightweight rigid panels split the difference.
Common Installation Mistakes (And How to Avoid Them)
Most of these show up in the first six months. Some show up immediately.
- Wrong sealant for the roof type. EPDM lap sealant on a fiberglass roof cures but doesn't bond properly. Silicone on EPDM contaminates the surface for years. Always verify compatibility before you open the tube.
- Undersized cable on the controller-to-battery leg. The panel-side cable looks fine; the battery-side cable is doing 3–5× the current. They need to be very different gauges.
- Fuse too far from the battery. A 12-inch cable run with no fuse between the battery and the fuse is 12 inches of unprotected wire that can arc if damaged. The fuse belongs at the battery, not halfway along the run.
- Connecting panels before the controller. Takes two seconds to do wrong and potentially destroys the controller. The wiring order is non-negotiable.
- Not checking series voltage. Two 50V panels in series equals 100V open-circuit voltage. If your controller's max input is 100V, that's right at the limit — and Voc increases in cold weather. Leave margin.
- Skipping the tug test on MC4 connectors. They click at about 70% engagement. Full engagement requires a noticeable second click or snap. Partially-seated MC4s arc under load and cause fires at the junction.
- No cable support on flexible panel leads. The short leads coming off a flexible panel flex with every road vibration. Over time, unsupported leads fatigue at the junction box, crack the wire insulation, and eventually fail. Clip them down within 4–6 inches of the panel exit.
Expanding an Existing System
Adding panels or batteries to a working system is straightforward — if you check the right things first.
Before adding panels:
- Verify your charge controller has enough headroom. Check its maximum input wattage (or voltage × current rating). Adding panels beyond this doesn't just waste the extra capacity — it can damage the controller.
- If adding panels in parallel with existing ones, the new panels should ideally match the existing Voc and Isc values. Mismatched panels in parallel can cause one string to partially back-feed the other.
- Add a new inline fuse for each new parallel string.
Before adding batteries in parallel:
- The new batteries should be the same chemistry, brand, capacity, and ideally the same age as the existing bank.
- Charge all batteries to the same state of charge before connecting them in parallel — connecting a full battery to a depleted one creates a surge current that can stress the BMS.
- Use identical-length cables from the battery terminals to a bus bar rather than chaining batteries together — this ensures balanced current distribution.
What's Next After Installation?
Once your system is commissioned and running, there are a few other pieces to the RV solar puzzle worth understanding:
- If you're planning to run the air conditioner, the system requirements jump significantly — read our guide on running RV AC on solar power before sizing up.
- For a full wiring deep-dive including AWG charts, fuse size calculations, and 12V vs. 24V system comparison, see our complete RV solar wiring guide.
- For a realistic breakdown of what all of this costs, our RV solar system cost breakdown covers every component including the hidden costs most people don't budget for.
PA621 Series — Vibration-Resistant Lightweight RV Panel
Cell-level shade management (Shade-Smart™) and Cool-Back™ thermal backing. Designed specifically for RV rooftops with shading from AC units, antennas, or trees.
- Available 100W–220W per panel
- Ultra-lightweight; reinforced for road vibration
- OEM/ODM custom sizes available
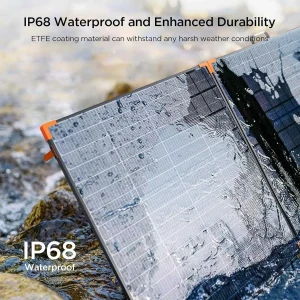
PA219 Series — TÜV/CSA Certified Flexible Panel (100W–490W)
3mm thin, 3.3 kg/m² ultra-lightweight ETFE flexible panel. Bonds to curved RV roofs without brackets. Class C fire-rated, salt mist certified, 10-year warranty.
- Voc range 28V–47.3V (100W–490W)
- Max system voltage 1,500V DC (IEC)
- TÜV & CSA certified
SGM Series — TÜV & UL Certified Rigid Glass Panel
High-efficiency rigid monocrystalline panel for flat-roof RV installations. Best efficiency, 25+ year lifespan, ideal for trailers and large motorhomes with bracket mounting space.
- TÜV & UL dual certified
- 21–23% module efficiency
- 25-year linear power warranty
TOPCon Series — N-Type, 26.1% Cell Efficiency
N-type TOPCon technology with <1% first-year degradation and 0.25%/yr thereafter. Zero LID/LeTID. Best choice for space-constrained RV roofs where every watt per square foot counts.
- Pmax temperature coefficient −0.30%/°C
- 10-year product + 25-year power warranty
- MPPT compatible, 12V/24V/48V systems
Related Guides
Frequently Asked Questions
Is it hard to install solar panels on an RV yourself?
Moderate difficulty. Most of the physical steps — measuring, mounting brackets, routing cables — are manageable for someone comfortable with basic DIY work. The two trickiest parts are waterproofing the roof penetrations and getting the wiring order right. Budget 1–2 full days for a 200–400W system, longer if you're routing cables through wall cavities or dealing with a curved roof.
Do you have to drill holes to mount solar panels on an RV?
Not necessarily. Flexible panels with VHB tape or adhesive mounting require zero drilling for the panels themselves. You'll still need a cable entry point to bring wires inside — either a dedicated cable gland (requires a small hole) or an existing RV conduit. Rigid panels on Z-brackets do require bracket bolt holes.
Can I glue flexible solar panels directly to my RV roof?
You can, but adhesive-only installs have a real failure rate on long highway trips. Vibration over thousands of miles stresses the bond constantly, and thermal cycling (the roof gets very hot in direct sun) works on the adhesive every day. The safer method is adhesive plus mechanical fastening — either stainless bolts with large backing washers through the panel grommets, or an aluminum perimeter press strip. It's not overkill; it's what keeps the panel on the roof in year three.
What sealant should I use for RV solar panel roof penetrations?
Match the sealant to your roof membrane. EPDM roofs need EPDM-compatible lap sealant — self-leveling for horizontal surfaces, non-sag for vertical. Fiberglass roofs work well with Sikaflex 715 or similar polyurethane. TPO roofs need TPO-compatible products. Never use standard bathroom silicone on EPDM or TPO — it doesn't bond properly and contaminates the area for future repairs.
Do I need a permit to install solar panels on my RV?
In most cases, no permit is required for self-contained 12V/24V DC RV solar systems. However, if you're adding a large inverter system or the work connects to your RV's 120V AC shore power circuit, check your state's RV code requirements. Some extended warranties and insurance policies also have specific installation requirements — worth reviewing before you start.
Sources & Further Reading
RV Solar Panel Size Calculator — Sungold Solar · Complete RV Solar Wiring Guide — Sungold Solar · RV Solar System Cost Breakdown 2026 — Sungold Solar · Technical references: NEC 690 (Solar Photovoltaic Systems), IEC 61215 (PV Module Performance), Renogy DIY Solar Installation Guide, Victron Energy MPPT Wiring Best Practices.
Content reviewed for accuracy May 2026. Sungold Solar is a B2B & OEM solar panel manufacturer specializing in flexible, lightweight, and anti-shading solar solutions for RV, marine, and off-grid applications.