




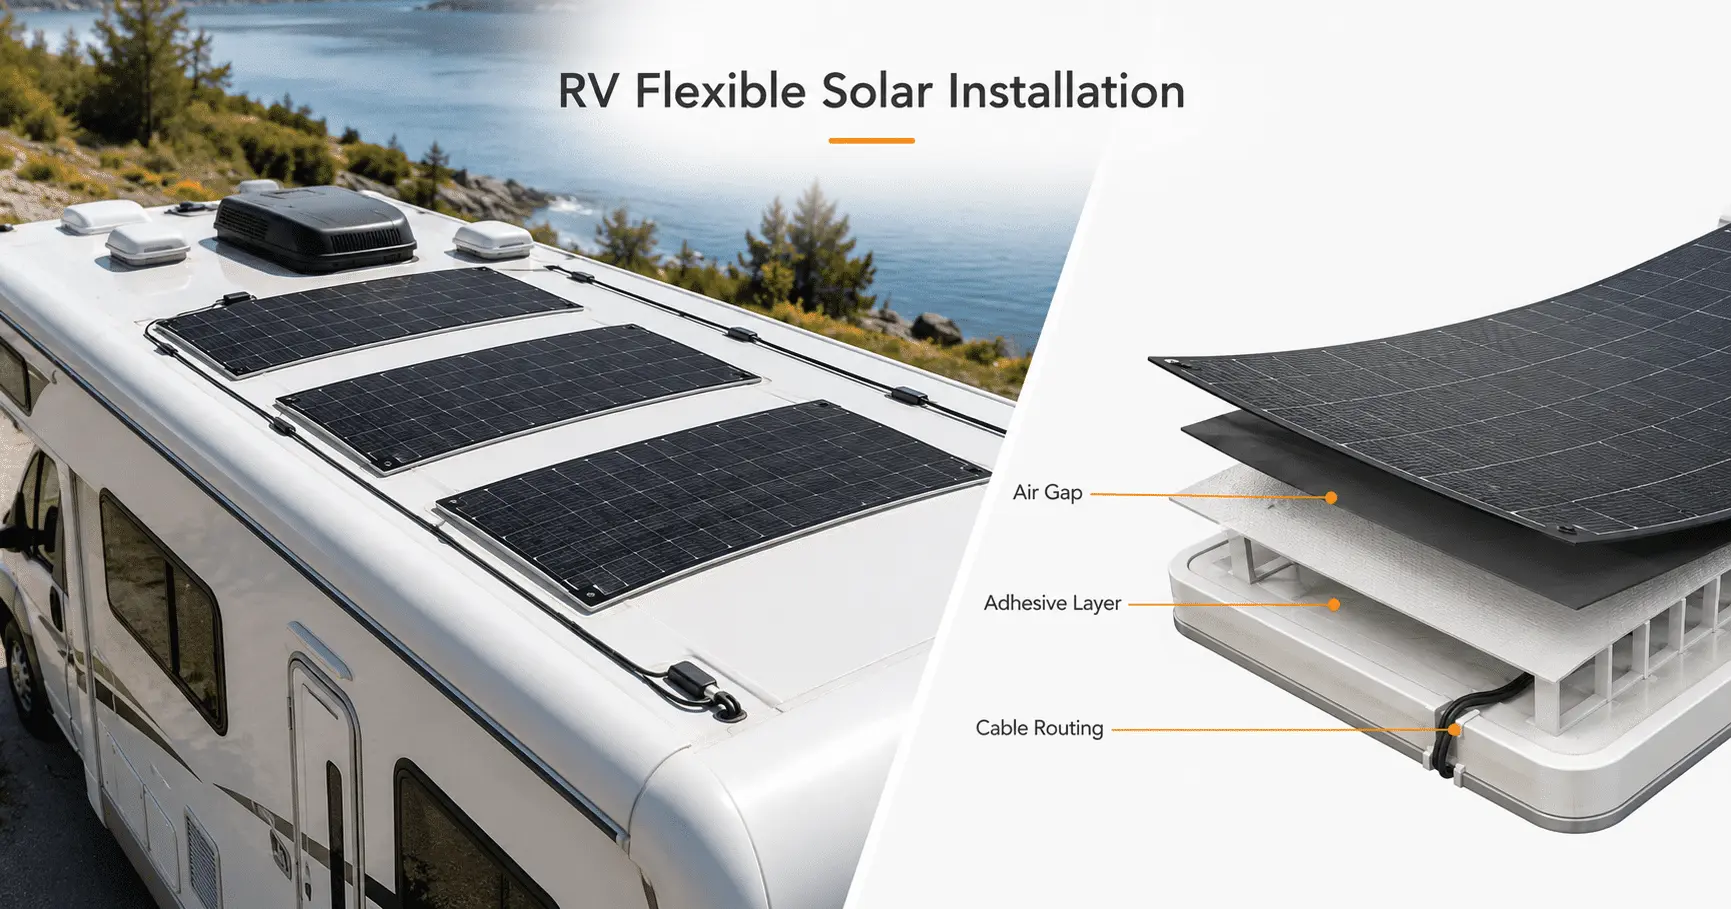
When you install flexible solar panels on RV roof, the mounting method affects more than appearance. It can change panel temperature, roof heat transfer, adhesive bond strength, thermal expansion, wind uplift, vibration fatigue, and long-term power output.
If a flexible panel is bonded directly to a hot roof with no rear ventilation gap, the system may look clean, but the cells can run hotter and the adhesive interface may face more thermal stress. A raised air gap, honeycomb backing layer, spacer material, or reinforced lightweight backsheet can help manage heat and deformation, but each option still needs to match the roof material, drainage path, cable routing, and bonding method.
For RV builders, distributors, and OEM project teams, the better first question is not only “How do we stick the panel to the roof?” It is “Which installation structure protects the panel from heat, deformation, wind uplift, and road vibration over time?”
Quick Answer: How Should You Install Flexible Solar Panels on an RV Roof?
Flexible solar panels should be installed on an RV roof with a mounting method that manages heat, protects the adhesive bond, supports roof movement, and reduces vibration stress. For many RV projects, that means avoiding full-surface glue coverage, checking whether a rear air gap is needed, using roof-compatible adhesive, protecting the leading edge from wind uplift, and routing cables with strain relief.
The right method depends on the roof material, panel size, travel environment, expected temperature, serviceability needs, and whether the installation is a DIY retrofit, distributor kit, or OEM vehicle program.
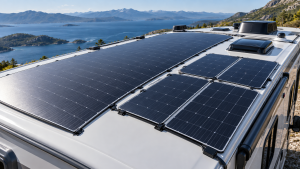
Flexible panels are popular on RV roofs for good reasons. They are lightweight, low profile, and easier to fit around curved surfaces, vents, air conditioners, and other roof equipment. But the same low-profile structure also creates the main installation risk: the panel often sits very close to a hot roof.
That is why a good RV flexible solar installation should start with the roof and mounting structure, not only the panel wattage. A 100W or 200W panel can perform very differently depending on whether it is bonded flat, lifted slightly for airflow, mounted over a spacer layer, or integrated with a reinforced backing structure.
What We Check Before Recommending an RV Flexible Solar Panel Installation Method
The best installation method is the one that fits the vehicle, the panel, and the use case. A weekend camper, a hot-climate van conversion, and a commercial RV production line do not need the same mounting decision.
| Installation factor | Why it matters | What buyers should verify |
|---|---|---|
| Roof material | Adhesive performance changes by substrate. | Fiberglass, aluminum, painted metal, TPO, EPDM, composite roof, coating age, and surface condition. |
| Heat exposure | Higher cell temperature reduces output and can accelerate material stress. | Climate, roof color, roof insulation, direct bonding area, and whether an air gap or backing layer is needed. |
| Roof curvature | Forced bending can create uneven stress. | Minimum bend radius, flat support area, panel size, and whether smaller panels are safer than one large panel. |
| Adhesive system | The bond must handle peel, shear, heat, moisture, and vibration. | Surface preparation, primer, tape or adhesive type, application pressure, cure time, and edge sealing. |
| Wind and vibration | Moving vehicles expose panels to dynamic loads. | Leading-edge protection, cable strain relief, panel support, and inspection after road use. |
| Serviceability | Some bonded panels are hard to remove without roof work. | Future replacement, cleaning access, cable access, and whether a semi-removable structure is preferred. |
Direct Bonding vs Air-Gap Mounting for RV Flexible Solar Panels
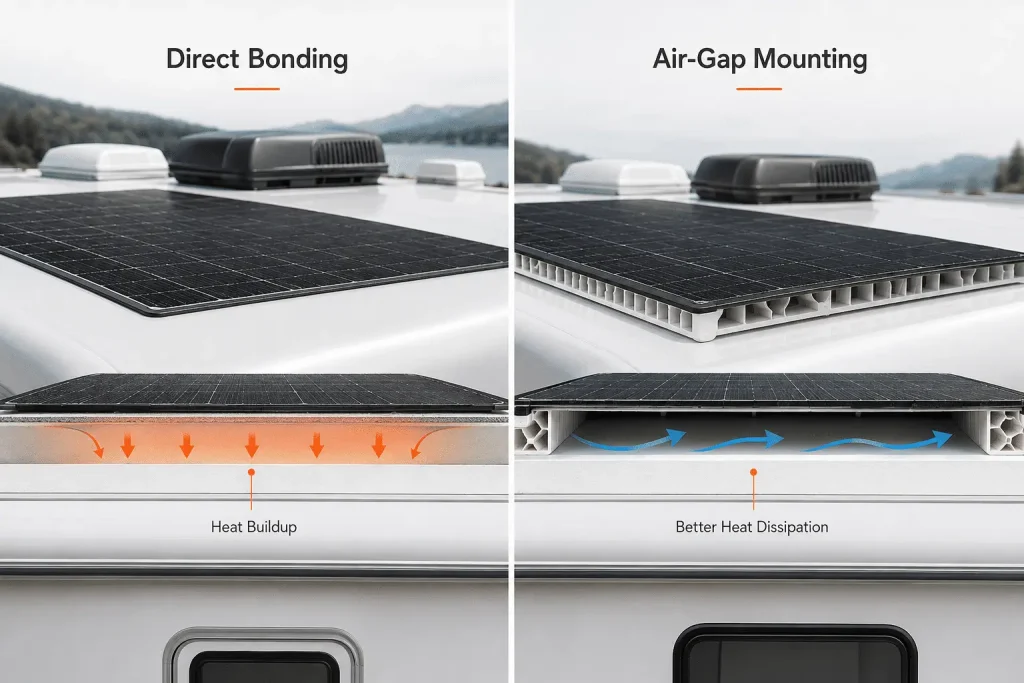
Direct bonding is common because it is clean and low profile. It may fit small panels, short-duty use, or roofs where the panel and adhesive supplier both approve the method. But for larger panels, hotter climates, or commercial RV projects, a no-gap installation can create avoidable heat and adhesive stress.
| Mounting method | Where it fits | Main advantage | Main risk to check |
|---|---|---|---|
| Direct adhesive bonding | Small panels, low roof height, clean flat roof surfaces. | Simple, thin, and visually clean. | Heat buildup, difficult removal, and adhesive stress. |
| VHB tape plus perimeter sealant | RV retrofits and light-duty no-drill installs. | Clean bonding with fewer roof penetrations. | Surface preparation, peel strength, and edge lifting. |
| Butyl tape with mechanical support | Roof accessories, mounting strips, glands, or sealing areas. | Useful sealing support. | Not always suitable as the only structural bond. |
| Structural adhesive | OEM or controlled workshop installation. | Stronger bonding on suitable substrates. | Compatibility, cure condition, and dynamic load behavior. |
| Raised air-gap mounting | Hot climates, larger panels, and long-use vehicles. | Better heat dissipation under the module. | More wind uplift and mounting complexity. |
| Honeycomb or spacer backing | Projects needing thermal separation and support. | Helps create airflow, stiffness, or thermal isolation. | Added thickness, weight, drainage, and edge sealing. |
How Heat Buildup Affects Flexible Solar Panels on RV Roofs
Heat is usually the first problem to solve in flexible solar panel RV roof installation. Solar cells naturally produce less power as they get hotter, and an RV roof can add heat from below while the sun heats the panel from above.
NREL’s PVWatts guidance separates open-rack and roof-mounted assumptions because airflow around the module affects operating temperature. That idea matters even more for flexible modules bonded close to a vehicle roof. If the back of the panel has little airflow, heat has fewer ways to escape.
Common ways to reduce heat stress include leaving a controlled rear ventilation gap, using a honeycomb backing layer, adding a spacer material, avoiding full-surface adhesive coverage that traps heat, and keeping drainage paths open around the panel edges.
For a deeper discussion of this issue, Sungold’s guide to flexible solar panel overheating solutions explains why airflow and backing structure matter in mobile and off-grid installations.
How Roof Curvature and Thermal Expansion Cause Panel Deformation
Flexible panels can bend, but they should not be forced into every roof shape without limits. A curved RV roof, uneven adhesive thickness, trapped heat, and repeated thermal expansion can all create deformation over time.
In practical terms, deformation usually comes from three conditions. The roof may not be flat, so some areas carry more stress than others. The panel and roof may expand at different rates as temperature changes. Or the installer may create hard points with screws, cable glands, adhesive lumps, roof ribs, or uneven spacer materials.
A better installation spreads the load, avoids sharp bending, and gives the panel room to behave like a flexible electrical product rather than a decorative roof skin. If the roof has heavy curvature or repeated shading from roof equipment, it may be safer to use smaller panels, multiple panel zones, or a panel type designed for mobile roof stress.
Which Adhesive Works Best for RV Flexible Solar Panel Installation?
There is no universal best adhesive for RV flexible solar panel installation. Adhesive performance depends on roof material, surface cleaning, primer, application pressure, temperature, cure time, and how the load is distributed across the panel.
3M’s VHB application guidance emphasizes surface cleaning, suitable surface preparation, and firm application pressure. Sika’s RV bonding resources also treat adhesive selection as a substrate-specific decision. That is the practical lesson: the adhesive is only one part of the bonding system.
| Material | Typical role | What to verify |
|---|---|---|
| 3M VHB tape | Bonding flexible panels or mounting strips to prepared surfaces. | Surface compatibility, peel strength, pressure, temperature range, and primer needs. |
| Butyl tape | Sealing around mounts, glands, or roof hardware. | Water sealing, compression behavior, and long-term edge stability. |
| Polyurethane structural adhesive | Stronger bonding for suitable substrates and controlled installation. | Compatibility, cure time, dynamic load resistance, and service conditions. |
| Roof sealant | Weatherproofing exposed edges and roof penetrations. | UV resistance, roof material compatibility, and maintenance interval. |
A common mistake is treating sealant as structure. Sealant helps keep water out. It does not automatically replace a proper mechanical or adhesive bonding design.
How to Install Flexible Solar Panels on RV Roof Step by Step
The installation sequence should force the right checks before anything is bonded permanently.
1. Inspect the RV roof before choosing the panel
Check roof material, curvature, ribs, old sealant, vents, air conditioner position, shadow areas, and cable entry path. Flexible panels are useful on curved or crowded roofs, but they still need a stable support surface and a layout that avoids sharp bending.
2. Decide whether the panel needs a rear air gap
Before bonding the panel directly, decide how heat will escape. In hot regions or long-term RV use, consider an air-gap structure, honeycomb backing layer, or spacer layer. The goal is not simply to lift the panel as high as possible. The goal is to create enough thermal separation while keeping the structure stable against wind and vibration.
3. Choose the bonding method based on roof material
Do not select adhesive only by brand name. Match the bonding method to the roof material and surface condition. Clean the surface, remove weak coatings where appropriate, and follow the adhesive manufacturer’s instructions for primer, pressure, and cure time.
4. Avoid full-surface bonding when heat and moisture are concerns
Full-surface glue coverage can look secure, but it may trap heat and moisture under the panel. Many projects benefit from controlled bonding zones, edge protection, or a backing layer that allows heat and moisture management.
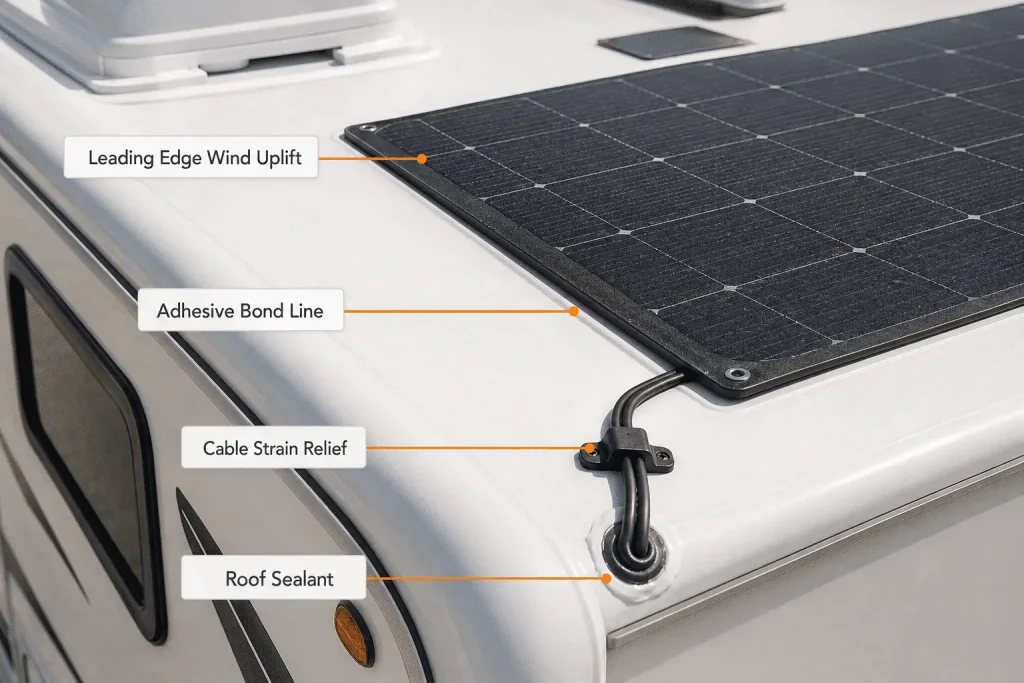
5. Protect the leading edge and cable exits
The front edge facing airflow needs special attention. Use a layout that reduces the chance of wind getting under the panel. Cable exits should not be under tension, and roof entry points should be sealed with suitable glands and weatherproofing materials.
6. Test before final sealing
Before final sealant work, check polarity, voltage, current, controller compatibility, and cable routing. After bonding and sealing, inspect edges, roof penetrations, and drainage paths. A panel that tests correctly on the ground can still create problems if the roof installation traps heat or stresses the laminate.
Where Sungold PA621 Fits in RV Roof Installations
For RV buyers, the panel choice and installation method should be considered together. A lightweight flexible panel may reduce roof load, but the backsheet structure, vibration resistance, and thermal behavior still matter.
Sungold’s PA621 lightweight solar panel is positioned for RV and mobile off-grid applications where roof heat and road vibration are part of the design conversation. Buyers comparing panel types can also review the difference between flexible and rigid solar panels before deciding whether a flexible roof installation is the right direction.
The important point is not to treat the panel as separate from the roof. For mobile vehicles, the panel, adhesive, backing layer, cable layout, and roof material work as one system. Sungold’s RV solar power solutions page gives a broader view of how lightweight panels, anti-shading design, controllers, and custom configurations fit into RV and camper van projects.
RV Flexible Solar Panel Installation Checklist
Before installation, confirm these items:
- Roof material and surface condition.
- Roof curvature and available flat area.
- Shading from vents, racks, antennas, and air conditioners.
- Whether direct bonding or air-gap mounting is more suitable.
- Adhesive compatibility with the roof surface.
- Required surface cleaning, primer, pressure, and cure time.
- Whether a honeycomb backing or spacer layer is needed.
- Cable exit direction and strain relief.
- Waterproofing method for roof penetrations.
- Edge protection against wind uplift.
- Controller voltage and current compatibility.
- Final inspection plan after the first road trip.
This checklist changes the quality of the installation. Most problems are easier to prevent before the panel is bonded than to repair after it has been exposed to heat, rain, and vibration.
FAQ About Installing Flexible Solar Panels on RV Roofs
Can flexible solar panels be glued directly to an RV roof?
Yes, some flexible solar panels can be bonded directly to an RV roof, but direct bonding is not always the best choice. The installer needs to check roof material, surface condition, heat buildup, adhesive compatibility, drainage, and removal difficulty. In hot climates or long-term mobile use, an air gap or backing structure may be safer for performance.
Do flexible solar panels need an air gap on an RV roof?
An air gap is not always mandatory, but it is often helpful. A rear ventilation gap can reduce heat buildup under the panel and lower thermal stress on the laminate and adhesive layer. For larger panels, hot regions, or commercial RV projects, the air-gap decision should be part of the installation design.
What adhesive is best for flexible solar panels on an RV?
There is no universal best adhesive. 3M VHB tape, butyl tape, polyurethane adhesive, and roof sealants all serve different purposes. The right choice depends on roof material, bonding area, panel size, wind exposure, vibration, and whether the material is used for structural bonding or waterproof sealing.
Why do flexible solar panels deform on RV roofs?
Flexible panels may deform because of roof curvature, uneven bonding pressure, trapped heat, thermal expansion, or hard stress points under the panel. Deformation risk increases when a panel is forced onto an unsuitable roof shape or bonded in a way that does not allow heat and material movement to be managed.
Can vibration damage flexible solar panels on moving vehicles?
Yes, repeated road vibration can stress the panel laminate, cells, interconnections, cable exits, and adhesive joints. This is why RV flexible solar panels should be installed with attention to load distribution, edge protection, cable strain relief, and product suitability for mobile use.
Final Thoughts
A flexible solar panel on an RV roof is easy to underestimate. From the outside, it may look like a simple adhesive job. In real use, it is a thermal, mechanical, and electrical installation exposed to heat, roof movement, wind, vibration, and weather.
For small DIY projects, a clean direct-bond installation may be enough if the roof and adhesive system are suitable. For distributors, RV builders, and OEM buyers, the better approach is to define the installation structure first: direct bonding or air gap, tape or structural adhesive, standard backsheet or reinforced backing, simple cable exit or serviceable routing.
The panel’s long-term performance is not decided by wattage alone. It is decided by how well the installation protects the panel from the roof it sits on and the road it travels over.
Need to evaluate an RV flexible solar panel installation?
Send your roof material, available panel area, target wattage, cable route, and mounting preference. Sungold can help review whether a standard flexible panel, lightweight RV panel, or custom structure is the better fit.