 EN
EN
 Deutsch
 Italiano
 Español
 Français
 日本語
日本語
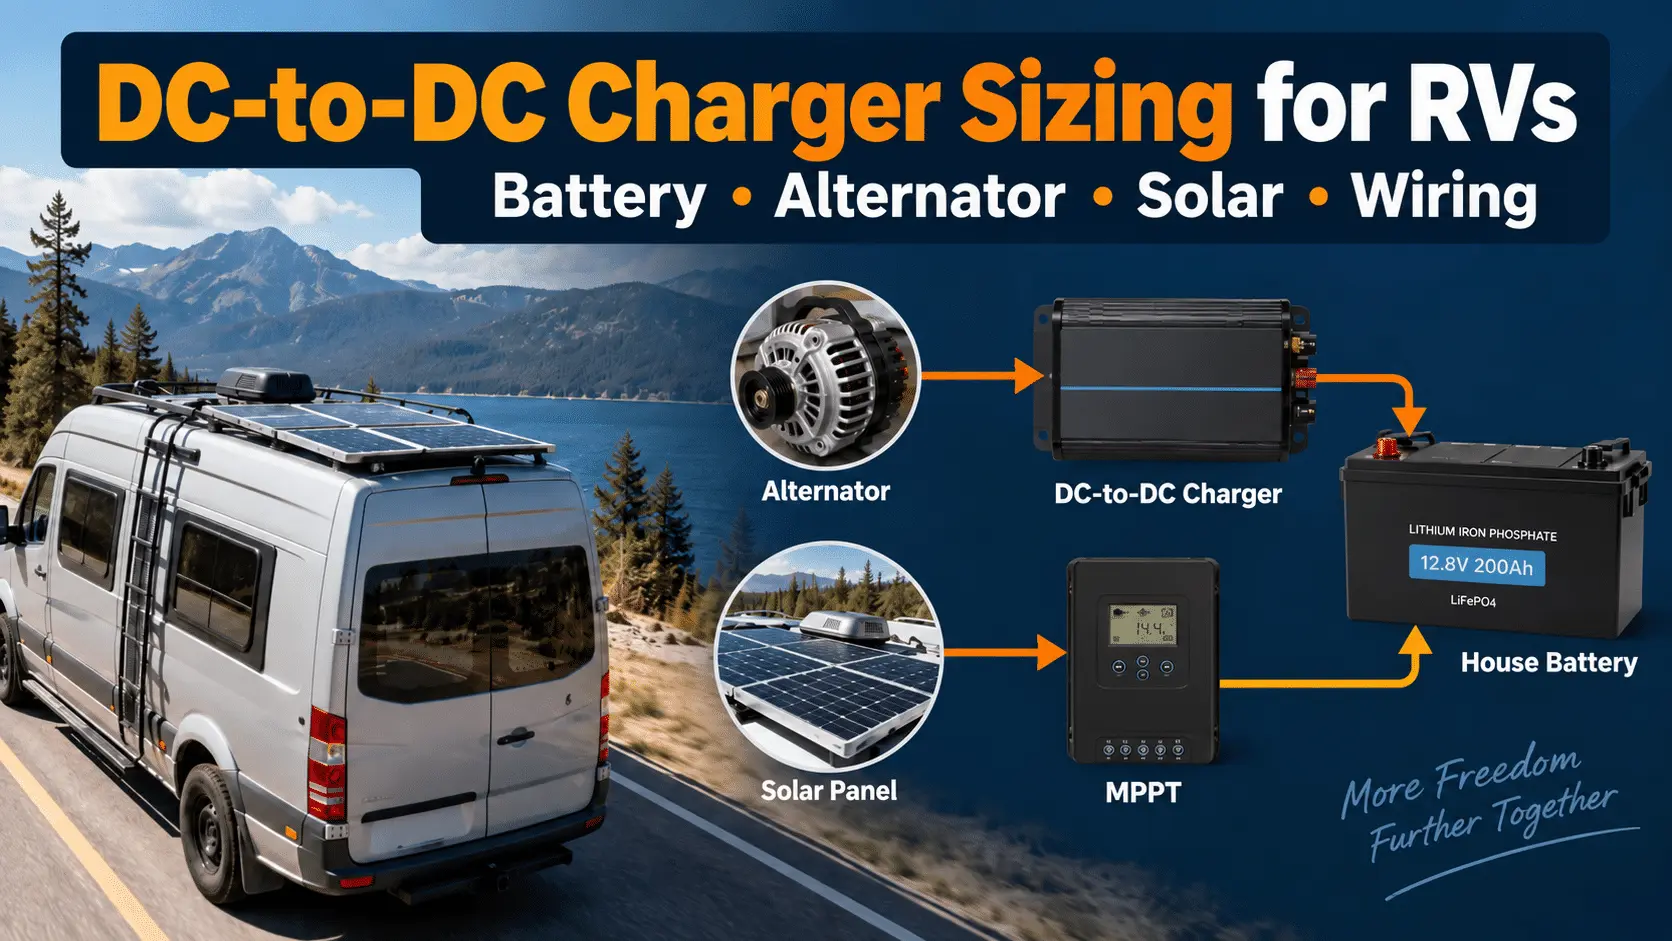
For an RV solar system, the charger is only one part of the charging path. Confirm the battery chemistry and voltage, vehicle requirements, solar controller or dual-input limits, cable length, fuse protection, connector layout, and future expansion plan before ordering.
DC-to-DC charger sizing becomes important when an RV uses the vehicle alternator to charge a house battery while driving. It becomes even more important when the same system also includes roof-mounted solar, portable solar, a battery monitor, or a combined DC-to-DC and MPPT charger.
Buyers often ask: “Should I use a 20A, 30A, 40A, or 50A charger?” The better question is: “What charging current can the complete RV system accept safely and consistently?”
This DC-to-DC charger sizing for RVs guide explains the main checks for RV owners, installers, distributors, RV brands, and solar kit developers. It focuses on system matching rather than recommending a specific charger brand.
What Does a DC-to-DC Charger Do in an RV Solar System?
A DC-to-DC charger transfers energy from the vehicle-side electrical system to the RV house battery while controlling the charging profile between the two sides.
The charger can help separate the vehicle starting system from the house-battery charging path. It may also provide a controlled charging profile for a battery chemistry that should not be connected directly to the alternator without the correct regulation.
A DC-to-DC charger does not replace the solar charge controller. Roof-mounted or portable solar normally uses a separate controller, unless the selected equipment is specifically designed as a combined DC-to-DC and MPPT unit.
That distinction matters because a charger can be electrically compatible with the battery but still be unsuitable for the alternator, cable run, solar input, or total system current.
DC-to-DC Charger vs Solar MPPT Controller
| Component | Primary input | Primary role | Key checks |
|---|---|---|---|
| DC-to-DC charger | Vehicle alternator or starter-battery side | Regulates vehicle-derived charging to the house battery | Input and output voltage, output current, alternator capacity, battery profile, cable and fuse design |
| Solar MPPT controller | Roof-mounted or portable solar array | Converts and regulates PV power for the house battery | PV Voc, Vmp, Isc, Imp, maximum PV voltage, maximum PV power, battery voltage |
| Combined unit | Vehicle input and solar input | Manages two charging sources in one product | Total output limit, source-priority logic, input limits, thermal performance, installation manual |
Do not assume that the rated output of a combined unit is available independently from both sources. Some products have a total charging-current limit, and the output may be shared or managed differently when alternator and solar inputs operate at the same time.
DC-to-DC Charger Sizing for RVs: Start With Four Limits
Preliminary sizing should compare the charger output with the lowest safe limit in the system:
This is a screening rule, not a substitute for the equipment manuals. It helps prevent the common mistake of selecting a charger only from the battery’s amp-hour label.
1. Check the house battery’s maximum charging current
Battery capacity and allowable charging current are different specifications. A battery may have a large nominal capacity but a lower recommended or maximum charge current. The battery manufacturer or BMS documentation should define the applicable limit.
Check the battery voltage, chemistry, recommended charge current, maximum charge current, temperature restrictions, BMS behavior, and charging profile. If the charger can deliver more current than the battery is designed to accept, configure the system within the battery limit rather than relying on the BMS to correct an oversized design.
2. Check the alternator and vehicle platform
The vehicle alternator must support the starting system, vehicle electronics, and the additional charging load under the expected driving conditions. The relevant question is not only the alternator’s headline rating. It is the capacity available after the vehicle’s own loads and control strategy are considered.
Check the vehicle manual, alternator type, idle and driving conditions, smart-alternator behavior, battery-sensing method, connection point, and any requirements from the vehicle or body builder. A higher-output charger is not automatically better if the vehicle cannot support it consistently.
3. Check the charger’s actual input and output limits
Review the charger’s input-voltage range, output voltage, rated output current, battery chemistry settings, temperature derating, start or ignition signal, and protection requirements. Confirm whether the published rating applies continuously or only under specified conditions.
If the charger has a solar input, review its PV voltage, current, and power limits separately. If the data sheet states a combined output limit, use the combined limit for system planning.
4. Check cable length, voltage drop, and protection
The cable run from the vehicle battery or alternator-side connection to the charger, and from the charger to the house battery, affects voltage drop, heat, installation cost, and fuse selection.
Confirm conductor size, cable length, insulation, abrasion protection, routing, terminals, connector rating, fuse or breaker location, and service access. The fuse and cable must be designed for the circuit and installation conditions; they should not be chosen only because the charger label says “30A” or “50A.”
Should You Size by Battery Ah or Alternator Capacity?
Use both, but do not treat either one as the only sizing input.
| Input | What it tells you | What it does not tell you |
|---|---|---|
| Battery capacity in Ah | Approximate storage capacity at a stated voltage and condition | Whether the battery accepts the desired charging current |
| Battery maximum charge current | Upper charging limit defined by the battery or BMS documentation | Whether the alternator, cable, and charger can support it |
| Alternator or vehicle capacity | Whether the vehicle-side source can support the added load | Whether the house battery or charger is compatible |
| Charger output rating | Potential regulated output under its specified conditions | Whether the complete installation can deliver that output continuously |
A large battery does not automatically require a large charger. The desired charging time, driving schedule, alternator capacity, cable plan, battery limits, and heat conditions must be considered together.
How Many Amps Should an RV DC-to-DC Charger Have?
There is no universal amp rating for every RV. A 20A, 30A, 40A, or 50A charger can only be evaluated after the battery, alternator, cable, fuse, charging time, and vehicle platform are known.
Use the lowest safe limit as the preliminary ceiling, then confirm how much charging current the RV actually needs during its normal driving window. A short daily drive, a small battery, or a limited alternator may favor a lower output. A larger battery does not by itself justify a higher output charger.
What Changes Between 12V and 24V RV Systems?
The charger output voltage must match the house-battery architecture. A 12V and a 24V RV system should not be treated as interchangeable, even when the target charging power appears similar.
| System architecture | Confirm before ordering | Typical design concern |
|---|---|---|
| 12V house battery | 12V charging profile, alternator-side input, cable current, fuse rating | Higher current at the same power can make cable length and voltage drop more important |
| 24V house battery | 24V charger output, battery configuration, PV/controller range, vehicle integration | The controller and charger must support the higher battery voltage and the selected charging profile |
| Expandable or mixed system | Future battery voltage, controller limits, series/parallel layout, service access | Later changes can exceed the original charger, controller, cable, or fuse design |
The correct choice is the one that matches the existing battery architecture and the vehicle integration plan. Do not convert a 12V or 24V label into a charger recommendation without checking the complete system.
Standard DC-to-DC or Dual-Input DC-to-DC With MPPT?
A standard DC-to-DC charger may be appropriate when the RV already has a separate solar controller and the main requirement is alternator-based charging while driving.
A dual-input unit may reduce component count when the product is specifically designed to accept both vehicle and solar input. It can be useful when the RV needs a more compact charging architecture, but it creates additional checks.
| Architecture | Potential fit | Questions to confirm |
|---|---|---|
| Separate DC-to-DC plus MPPT | Projects that need independent component selection or already have a solar controller | How the two controllers share the battery, monitor temperature, and coordinate charging |
| Dual-input DC-to-DC with MPPT | Compact RV systems where the combined unit matches both charging sources | Total current limit, input priority, PV limits, alternator requirements, thermal derating |
The choice should follow the RV’s electrical architecture. A combined charger should not be selected simply to reduce the number of boxes. Review the installation manual and confirm how the unit behaves when solar and alternator inputs are available at the same time.
Can You Add Solar Later?
Yes, a staged installation can work if the first installation is planned for the future solar path. The vehicle and house-battery charging architecture should reserve the required cable route, protection, busbars, controller space, roof entry, and service access.
Before installing the first component, document:
- future PV voltage and current range;
- controller or combined-charger input limits;
- planned cable route and maximum length;
- fuse, breaker, disconnect, and busbar locations;
- roof area, panel weight, mounting surface, and shade pattern;
- connector type, polarity, and weather protection;
- how the future solar source will share charging with the DC-to-DC charger.
Adding panels later without checking these items can create a controller mismatch, excessive voltage, excessive current, cable congestion, or an installation that is difficult to service.
How to Match RV Solar Panels With the Charger
The panel specification should be reviewed from the charge controller input backward to the roof. Confirm Vmp, Voc, Imp, Isc, maximum PV voltage, maximum PV power, panel quantity, series or parallel arrangement, cable length, connector type, and expected cold-weather voltage.
For RV roof projects, the panel format is also part of the electrical and installation decision:
- Flexible panels: may suit curved or low-profile surfaces, but bend radius, heat path, cable exit, surface preparation, and serviceability require review.
- Lightweight panels: may suit weight-sensitive roofs, but the mounting method and electrical design still need confirmation.
- Rigid panels: may suit accessible roof areas with a suitable structure and mounting system.
- Portable panels: may help when the roof is shaded or space is limited, but the portable controller and connection path must be compatible.
For panel-side evaluation, buyers can review Sungold’s RV solar kit solution, PA219 flexible solar panels, and PA621 lightweight solar panels. These links describe panel and RV-solution directions; they do not confirm compatibility with a particular DC-to-DC charger.
For the electrical relationships between panel voltage, current, and power, see the solar panel amps-to-watts guide. The final panel-to-controller match should use the current product datasheets.
Common DC-to-DC Charger Sizing Mistakes
| Mistake | Why it creates risk | Better check |
|---|---|---|
| Choosing by battery Ah alone | Capacity does not define the safe charge current, alternator limit, or cable design | Check battery, vehicle, charger, cable, and fuse limits together |
| Assuming a larger charger is always better | The source or battery may not support the extra current | Use the lowest safe system limit as the preliminary ceiling |
| Ignoring smart-alternator behavior | Vehicle voltage and charging behavior may change during operation | Check the vehicle documentation and charger activation method |
| Adding solar without checking Voc | Cold-weather PV voltage can exceed the controller limit | Check the full PV string voltage under the expected conditions |
| Assuming dual-input ratings are additive | Combined products may have a total output or thermal limit | Use the product manual’s combined-input logic and total rating |
| Using the BMS as the design control | A protective shutdown is not a substitute for correct sizing and protection | Design within the battery and system limits before commissioning |
For RV Brands, Distributors, and Solar Kit Developers
For an OEM or distribution program, charger selection is only one part of the product package. A repeatable RV solar kit needs a documented interface between the panel, charge controller, DC-to-DC charger, battery, wiring harness, mounting method, and vehicle platform.
Before requesting a panel quotation, provide:
- RV model or roof drawing and usable installation area;
- target battery voltage and chemistry;
- DC-to-DC charger or MPPT input requirements;
- target panel power, dimensions, weight, and thickness;
- cable exit position, connector, polarity, and cable length;
- mounting surface, bend or clearance requirements, and shade conditions;
- quantity, packaging, labeling, documentation, and target-market requirements.
Sungold’s role in this type of project is primarily on the solar-panel and custom-module side. DC-to-DC charger selection, vehicle wiring, fuse protection, and final installation should remain with the system brand, charger supplier, vehicle integrator, or qualified installer unless the project scope states otherwise.
FAQ
Not necessarily. Solar charges the house battery from the PV array, while a DC-to-DC charger uses the vehicle-side electrical system while driving. A DC-to-DC charger may be useful when the RV needs charging during travel, has limited roof solar, or regularly parks in shade. The correct choice depends on the battery, vehicle, solar controller, and charging plan.
Battery amp-hours are only one input. Confirm the battery’s maximum charging current, voltage, chemistry, BMS limits, alternator capacity, charger output, cable size, fuse design, and desired charging time. A larger battery does not automatically require the largest charger.
There is no universal answer. Compare the battery’s maximum charge current, the vehicle alternator’s available capacity, the desired charging time, the charger’s continuous rating, cable voltage drop, and fuse design. Treat 20A, 30A, 40A, or 50A as product categories to evaluate, not as automatic recommendations.
It can be suitable when the charger supports the battery’s voltage, chemistry, charging profile, temperature limits, and BMS or enable signal requirements. Lithium batteries can accept charging current differently from lead-acid batteries, so the battery and charger manuals must be checked together. Do not rely on a BMS shutdown as a substitute for correct sizing.
The charger output must match the house-battery architecture. A 12V or 24V label also affects current, cable voltage drop, controller compatibility, battery configuration, and vehicle integration. Confirm the actual battery bank voltage before choosing the charger or solar-controller configuration.
Only if the selected product is designed and rated for that operating condition. Check its source-priority logic, total output-current limit, PV voltage and current limits, thermal derating, and installation instructions. Do not add the two headline input ratings unless the manual explicitly allows that calculation.
Yes, a staged installation can be practical when the wiring, fuses, controller space, roof entry, battery connections, and total charging limits are planned in advance. Confirm the future panel voltage and current before selecting the first charger or cable route.
Send the panel Vmp, Voc, Imp, Isc, rated power, quantity, series or parallel arrangement, cable length, connector type, polarity, and expected temperature range. Also provide the battery voltage and chemistry, controller model, and the intended roof or portable-panel layout.
This article focuses on panel-side and custom solar-module selection. Sungold’s RV solar solution and custom panel work should be matched with the DC-to-DC charger and controller selected by the system brand, charger supplier, or qualified installer. Confirm the project scope and current product documentation before specifying a complete kit.
Provide the roof drawing or usable dimensions, target power and voltage, battery and controller requirements, panel weight and thickness limits, cable exit and connector details, mounting conditions, shade pattern, quantity, packaging, labeling, and documentation needs. This gives the supplier enough information to review panel fit without assuming the charger or vehicle wiring design.
The Victron MPPT manual illustrates why PV voltage, battery voltage, maximum PV voltage, and maximum battery charge current must be checked together. These are external component references, not Sungold product specifications.
Final Thoughts
The best DC-to-DC charger for an RV is the one that fits the complete charging system, not the one with the highest number on the product label.
Start with the house battery and vehicle limits. Then check the charger output, solar input, cable length, fuse protection, installation conditions, and future expansion plan. For an RV solar kit or OEM project, review the panel as part of the same system so that voltage, current, roof fit, weight, cable routing, and documentation remain consistent.
When the available information is incomplete, request a compatibility review instead of treating a nominal charger size as a final design decision.